Tracklogs mapping software
This is a review I wrote a while back on a well known outdoors forum (and the pics are from the Tracklogs website), to be honest not much has changed apart from a slight increase in price (so i’ve changed those), I still love the software, all It needs now is an IPhone App.
It’s another long one so best grab a cuppa or a pint if you are going to read it all.
1) Ordering.
This couldnt be easier, log onto their website, select the maps you want from a huge selection, they do all the usual OS Maps and scales along with arial photography and something called site centred mapping which allows you to pay for an area around a particular postcode or location.
I went for some of the Standard OS 1:25K maps that came in at £29.95 Each including delivery.
I ordered them on saturday night, paid via worldpay which accepts a variety of cards and is extremely secure.
I then tracked my order which was dispatched on Monday and Arrived on Tuesday.
2)Installation
The CD comes in a handy to store DVD box and has a simple insert with a few clear instructions on how to install the software and any additional maps.
The process is very simple and quick. Once the CD is inserted it automatically brings up the installation wizard.
Select where you want to install it and click next, the files are they pretty speedily installed onto your computer.
Once this is complete you are asked if you have any other maps you wish to inatall, at this point you can insert any other tracklogs cds that you have and select the maps from the packages directory…nice and simple.
Once all your maps are installed the wizard finishes and you can run the program.
The first time you run tracklogs, you are asked for your licence key which is clearly displayed on the box so no problems there.
3)First impressions

Available in 25K or 50K
First impressions of the load times involved are impressive taking no more than a few seconds to load. You are then presented with the main tracklogs work area.
On the left there is the items panel and search box, in the centre are the map, profile, routecard, statistics and 3d area boxes, and a selection of tabs to switch between them. On the right is the main UK map, this hilights the areas you have the maps for in
orange, you can then click to select an area on the map which then displays in the middle map panel.
Each window and panel is fully customisable and can be dragged to make it bigger or smaller as well as hidden out of view.
4) Configuring.
Before I planned any routes I decided to go through the options menu and take a look at the various things I could configure.
In here you have a variety of options to customise everything from how you view the maps to colours of tracks, windows, profiles etc.
I found this screen easy to understand and I soon had it configured how I thought I wanted it, knowing I could change it when I wanted.
5) Route
I had a route in mind as it was one I had previously walked before I got my GPS or the software so I decided to plot this one with a bit on an extension.

Detailed feature profile
It was extremly simple and involved dragging the start waypoint tothe map then dragging the starting trackpoint, this was followed by clicking along the route I wish to take to place new track points, Extremely easy and straight forward.
I then went through and added 2 alternative “escape” routes at various points incase of bad weather or lack of time, this was achieved in the same way as adding a track. To distinguish these routes i selected them and changed their overlay colours. I also added various waypoints such as a lunch stop and various features to the route, this is again a case of simply dragging and dropping each one to the location you want and editing its properties to re name it or ad an icon, these can then be dragged around the map so not to obscure any vital features.
If you make a mistake or change your mind you can undo or delete points which is handy if you decide you wish to add an extension or remove a bit of a walk.
You can also zoom into the map as close as you want so you can make your track more accurate.
You can add and remove trackpoints with ease, so if you have a long straigh stretch you can reduce the number of points where as for a complicated winding path you can add more for each turn.
You can also completely customise everything ou see from colours to fonts and borders.
My favourite bit about adding routes is the overlay, this makes it easy to see what is under and around your route, you can also configure the thickness and colour of the which makes it easier to see when printed.
I also like the way that it seamlessly integrates multiple maps so you dont even notice when going between a number of maps.
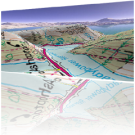
6) 3D, profile and other features

Handy 3D Mapping
Once the route was complete i decided to check out some of the features across the bottom of the screen starting with the profile.
The profile displays the ascent and descent of the route, this gives you an idea of when you will be going up and down and how high you will be going. IT also displays the distance and estimated duration.
Next was the route card, this showed all of the points on the route and estimated times and distances.
Finally there was the 3D walkthorugh, This is a pretty cool feature that allows you to view the route in 3D, you can choose from wire frame, solid land or map detail, the map details is basically the same as solid land but has the map overlayed so you can see the points and map features.
If you choose to play the route in this view you can follow the route on both the map and the 3D movie so you can get a rough idea of your route.
This can also be exported to a movie, which you have complete control over frame rate, size, encoding format etc etc which is a nice touch.
7) GPS Transfer
Now I had the route mapped out it was time to connect it to my GPS, this is the standard Garmin GPS60.
Uploading couldn’t be easier, select GPS transfer from the menu, click the save route tab and set how you wish to save the route, then plug your GPS in and turn it on, and click transfer. Seconds later the route is now on your GPS.
Downloading from the GPS is just as simple, plug in your GPS, go to GPS transfer and select what you wish to download from your GPS, hit transfer and it copies the selected data to tracklogs, displaying routes etc on the map.
8) Printing
Printing is where i think tracklogs reall excells, there are plenty of options to choose from when printing you map so you can completely customise the layout, how many pages, scale and such like. This makes it super easy to get the map from the screen to paper. There are even a couple of wizards to help you out.
I opted for the fit route to one page option, this put the route and surrounding area onto one a4 page and adjusted the scale as necesary, it has a very small white border around the page whichis great as it means you can get more on the page. It also prints the grid square numbers on the map for you. One thing it didn’t seem to include was the map reference numbers (sorry i’ve forgotten what they are called) so there is no indication of NZ or SE etc.
7) Help and support.
Ive not yet had to use the tracklogs support but i did have a browse of the website and the manual which comes in various formats on the website and i found all to be helpful and well written.
9) Route in use
I decided to try the route mentioned above just using the printed map and my gps, leaving my compass and proper map safely tucked up in my bag just incase.
It worked an absolute treat, we did a route across the north york moors, in the snow storms and mist yesterday with absolutely no problem. The number of points tracklogs stores helps on tricky windy wooded sections or on the moors where the paths aren’t obvious.
8) Conclusion.
If you want a decently priced mapping system thats easy to use, packed with features and works extremly smoothly but without PDA compatibilty then tracklogs is the one for you!
Uploading the routes to the GPS takes the fun out of navigation but the ability to plot and print routes as well as download routes from the GPS to the software and save/print/analyse is great.
Check out the Tracklogs website here


Follow Me!